Sunday, December 4, 2011

What's going on....

I know it has been over a month since I have posted anything, and the truth is I just haven’t had time to. Oh, and I really haven’t cooked anything in the last month either (except Thanksgiving and I did not get any pics :/). I’ve been really busy with work and trying to get myself back into school that this past month has just flown by. Another thing that has kept me from cooking and posting is that I have also been thinking about how I want to take the blog in a different direction and possibly even moving it (which I’m 99.9% sure the blog isn’t moving anywhere).

With all the said, here is the plan: I want to spend the rest of this month changing the layout, fonts, colors, etc of the blog. I plan on coming up with a new layout of how each post will look and what information is present to you and how it is presented (I even plan on going back and editing a bunch of the older posts to match the new format that the new posts will have). Last, I plan on coming back with new posts at the beginning of the New Year and posting something new for you at least once a week :).

Happy Holidays,
Amber


Saturday, October 22, 2011

Skeleton Graves

Pin It

I love to go wandering around craft stores and look at all the cool stuff that they have. Earlier this month I went to JoAnn’s Fabric store (they have a lot more than just fabric) and wandered around all of their Halloween stuff when I came across different Wilton chocolate molds they had. They had chocolate pop molds, molds for chocolate covers pretzel molds, and regular candy molds. I saw a chocolate mold for skeleton pieces and it suggested that you make a brownie or cake skeleton graveyard and I just had to try it. This was my second attempted at using chocolate molds and I still think it’s a easy and fun thing to do.


Recipe Review:

This is not really a recipe just a fun thing to do with food :)

What you need:

Skeleton Piece Wilton Chocolate Mold
Melting Chocolate (chocolate chips)
Brownie or Cake

Directions:

Make your chocolate skeleton pieces using the mold. Then lay the piece out on a piece of brownie or cake to make a grave.

Serving Suggestions:

Would be ideal for food fun at an October sleepover or served at a Halloween party.


Monday, October 17, 2011

Halloween Candy Corn Cereal Popcorn Balls

Right before October I went on a hunt for Halloween recipes. I searched every magazine I could get my hands on and I looked all over the internet to pick recipes. I came across this recipe online and thought it was a cute idea for popcorn balls and had to try it (with a few changes).


Recipe Review:

Ease: The popcorn balls we not hard to make, but they can be messy if not careful.
Taste: Sugary, but not much flavor.
Pros: Quick, easy, and Cheap.
Cons: Not much flavor

What you need:

2 cups Reeses Puff cereal
4 cups cooked popcorn
2 cups candy corn
4 tablespoons butter
10 oz marshmallows
4 tablespoons jell-o (orange for Halloween)

Directions:

Premix the cereal, popcorn, and candy corn. You could use whatever cereal you think would work best. In a large pot melt butter over a medium to low heat. Add marshmallows and stir until melted; then add jell-o.

Turn off the heat and add cereal, popcorn, candy corn mix. Mix well.

Let the mix cool for about 10 minutes. The coat your hands with butter or put sandwich bags over them and form popcorn balls out of the mix.


Serving Suggestions:

These would be okay to be served at a kids Halloween party.

Friday, October 14, 2011

Chocolate and Pretzel Skeleton Fingers


What you need:

Melting Chocolate or chocolate chip
Pretzel Sticks/Rods
Skeleton Finger Mold (I used Wilton’s)

Directions:

Melt the chocolate. You can do this 2 different ways: 1) pour the chocolate in a double boiler and stir over a low heat until melted or 2) pour chocolate in microwave safe dish and melt in 15-30 second intervals until melted (if microwaving chocolate it is best to use a plastic dish because it does not get as hot as ceramic and does not burn the chocolate as quickly). Next, pour melted chocolate into molds. Put a pretzel in the chocolate and continue filling as needed. Last, let the chocolate cool and harder. You can put it in the refrigerator to cool it faster.    


Monday, October 10, 2011

Ham Chowder


What you need:

2 packages cream cheese
6 cups water
8 chicken bouillon cubes
1 package of hash browns with green pepper and onions
1 package of ham sandwich meat or 1 slice of ham cut into bite size pieces
dash of onion flakes
1 teaspoon garlic powder

Directions:

Boil water and bouillon cubes until dissolved. Add cream cheese (softened). Stir occasionally and break up cheese until it is evenly mixed.
Add hash browns and cook and stir for about 20 minutes.
Add ham, onion flakes, and garlic. Cook on low heat about 30 minutes.

Monday, October 3, 2011

Popcorn Balls


What you need:

1 cup packed brown sugar
1 cup corn syrup
½ cup (1 stick) of butter
1 teaspoon salt
3-4 bags of popped popcorn

Directions:

Mix and heat brown sugar, corn syrup, butter and salt to simmering in a saucepan.


Boil rapidly for 2 minutes.

Pour over popcorn and stir until all the popcorn is covered.

You might want to start with 3 bags and add more as needed. Mix well and do not leave a lot of the brown sugar sauce in the bottom of the bowl or popcorn balls will be too gooey to form balls. Allow to rest until cool enough to handle 30 mins to a hour.

Cover hands with sandwich bags or butter and form into balls.

Cool completely. Wrap individually in plastic.

Wednesday, September 28, 2011

Hawaiian Open-Face Sandwiches


What you need:

English Muffins
Honey Mustard
Leftover Chicken or Turkey
Pineapple
Provolone or Mozzarella cheese slices

Directions:

Toast English Muffins.


Spread with Honey Mustard.


Layer the sandwiches with chicken, pineapple, and then cheese.


Broil in oven until cheese melts.

Sunday, September 25, 2011

Pull Apart Parmesan Garlic Biscuits


What you need:

3 – 5 tbsp butter, melted
Garlic Powder
Grated Parmesan
Tube of refrigerated biscuits

Directions:


Coat the bottom of a pie plate with butter and garlic (garlic is optional).


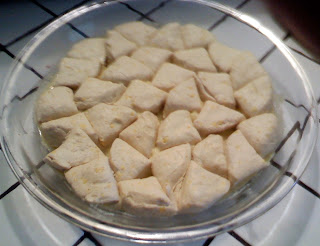
Cut each biscuit into quarters.


Arrange biscuits on top of butter.


Sprinkle with Garlic Powder and Parmesan.


Bake 12 – 15 minutes at 425˚.


Invert onto a serving plate to serve.


Tuesday, September 20, 2011

Creamy Chicken Enchiladas

This is by far one of my favorite dishes to make. It’s not the making it that makes it my favorite, but it’s how yummy it is. They are good served with lettuce, sour cream, and tomatoes. Also, the enchiladas are really good reheated the next day for lunch.


What you need:

1 Tbsp butter
1 can Old El Paso Mild Green Chile Enchilada Sauce
1 (8 oz) package cream cheese, cut up and softened
2 cups cooked chicken breast, chopped
8” flour tortillas
2 cups Monterey Jack cheese, shredded
1 pint whipping cream

Directions

Preheat oven to 350°F.

Melt butter in large skillet over medium heat. Add Enchilada Sauce and cook for 1 minute.


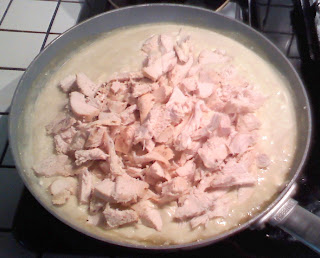
Stir in cream cheese and chicken and cook, stirring constantly until cream cheese melts.


Spoon 2-3 tablespoons of chicken mixture down center of each tortilla.


Roll up tortillas and place seam side down in lightly greased baking dish.


Sprinkle with Monterey Jack cheese, and drizzle with whipping cream.


Cover with foil and bake for 30 minutes. Take off foil and cook for another 15 minutes.


Saturday, September 17, 2011

Onion Soup Roasted Potatoes


What you need:

4-6 red potatoes
1/3 cup vegetable oil
1 package Lipton Onion Soup Mix (pictured below)


Directions:

Wash and cut potatoes into wedges.

Mix potatoes, oil, and onion soup mix.

Spread out evenly on aluminum foil covered baking sheet.

Bake at 450˚F for 15 to 20 minutes, or until desired doneness.


Wednesday, September 14, 2011

Macaroni and Cheese with Leeks

Let me start off by saying I am not really into macaroni and cheese; I do not even like Kraft macaroni and cheese, but I must admit that I am a sucker for a good bowl of homemade macaroni and cheese. I came across this recipe for macaroni and cheese with leeks and just had to try it. Before this making this dish I had never eaten a leek before, but I love onions and green onions, so I figured that leeks would be just as good. Turned out the leeks were really good and they blended really well with the macaroni and cheese, which made this dish amazing in my opinion.


What you need:

1/4 cup butter
5 cups chopped leeks (about 5)
1/4 cup all purpose flour
3 1/2 cups whole milk
1 pound (4 cups) grated extra-sharp cheddar cheese
1 tablespoon Dijon mustard
2 eggs
1 pound penne pasta

Directions:

Melt 1/4 cup butter in heavy large saucepan over medium heat; add leeks and stir to coat. Cover saucepan and cook until leeks are tender, but not brown, stirring occasionally; about 12 minutes.

Add flour; stir 2 minutes. Add milk; bring to simmer, stirring often.

Add cheese and mustard, and stir until cheese melts.

Remove from heat; salt to taste. Meanwhile, cook pasta in large pot of boiling. Drain and return to pot. Stir cheese sauce into pasta in pot. Transfer to buttered casserole dish.

Bake at 400°F for 20 to 30 minutes; until cheese sauce is bubbling. Let cool 15 minutes, then serve and enjoy.